Watermark Master enables to process the fragments
of a source movie instead of a whole movie.
To set a timeline (the source movie's fragment
to be processed or, on the contrary, excluded from editing) for a source
video file, go to the Timeline tab in the preview area of the main program
window. Click the source file in the "Source Files" window.
Now click button on the Timeline toolbar or open menu Timeline >
Add Timeline (or press "CTRL+ ALT+L"). The following parameters
are available in the opened "Add Timeline" dialog window:
Start
Point - the start point of the timeline (in hh:mm:ss.ms format,
where hh - hours, mm - minutes, ss - seconds, ms - milliseconds).
Relative
to End point - if enabled, the start point will be calculated relative
to the end point.
End
Point - the end point of the timeline (in hh:mm:ss.ms format).
Relative
to Start point - if enabled, the end point will be calculated relative
to the start point.
Relative
to the end of file - if enabled, the end point will be calculated
relative to the end of file.
End
of file - if enabled, the end point will coincide with the end
of file.
Adjust the parameters and click
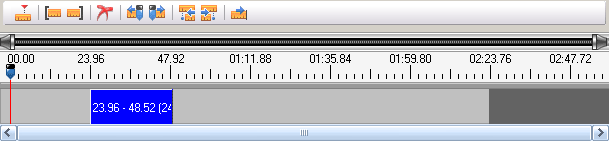
"OK". Now you can see the specified timeline marked with
blue on the timeline ruler in the Timeline
control. Click the timeline to view its properties in the "Properties"
window.
Besides, a few parameters are available on
the Timeline toolbar:
Mode
- the way the specified timelines will be used:
Process All Timelines
- the produced video will include all
specified timelines, the rest of the source file's parts won't be included.
Process All except
Timelines - the produced video will include no
specified timelines, it will be composed of the rest of the source file's
parts.
Timelines
for current file - if enabled, the specified timelines will be
applied to the selected file only; otherwise they will be applied to all
source files. This option may be useful when you process a great number
of files and want to set individual timelines for each of them.
A special control for working with timelines
is located under the player on the Timeline tab. This control enables
to set timelines visually.
To start working with the control, click a
source file in the "Source File" window. Now to set the start
point of a new timeline, click the required position on the timeline ruler.
If the scale of the ruler does not allow you to select the required position
precisely enough, you can zoom the ruler in using the ruler magnifier
(located directly over the ruler).
After the slider is set, open menu Timeline
> Add Check Point (or Add Start Check Point) or press "CTRL +
1"- the start point is assigned.
Then move the slider to another position and again open menu Profile >
Timeline > Set Point (or Set End Point) or press "CTRL + 1".
Now both the start and end points are assigned, and a new timeline is
created.
You can shift any added timeline by clicking
and dragging it. To change the start or end point of any timeline, click
and drag its left or right edge.
The following commands are also available in
Timeline menu:
Expand
to End of File - moves the end check point of current timeline
to the end of file.
Move
Start Point to Cursor - moves the start check point of current
timeline to the slider position.
Move
End Point to Cursor - moves the end check point of current timeline
to the slider position.
Goto
Start Point - moves the slider to the start check point of the
most recently added timeline.
Goto
End Point - moves the slider to the end check point of the most
recently added timeline.
Goto
Next Timeline - moves the slider to the start check point of the
next timeline.
Goto
Prev Timeline - moves the slider to the start check point of the
previous timeline.
Clear
Check Point - removes an odd check point.
Previewing
the results.
To preview the results before encoding, switch
back to the Watermark tab and click the play button in the player.